Here are the steps on how to add hyperlinks in the content of stories and custom widgets:
Enter text or an image which you would like to use as a link. Eg. "Click here to learn more!". Highlight the text or image you just entered.
Then click on the Link icon on the tool bar.

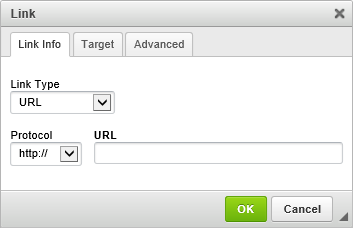
You will get the following Insert Link window.

Choose which Link Type you would like:
Link Types:
URL: Allows you to enter in any URL or website address which will redirect visitors to that site. Be sure to include the http:// in front of the website address. Target lets you specify whether to open that link in the same window or a new one.
Protocol: The protocol will automatically update based on the link entered. Most of the time, the protocol will automatically be set to https://, if a link is copied into the URL field. You can change the protocol to <other> then enter a Merge Field to link to the merge field’s URL to the text.
Built-in Page: Built-in pages are system created pages that update automatically. The options you can choose are:
Home - The club's home page.
Bulletin List - A webpage with a list of club bulletins.
Club Executives - A webpage displaying the Club Executives as a list.
Contact Us - A webpage which a person can email the website contact.
Download Files - A webpage that lists files in the Download Files area
Event Calendar - A webpage that displays a calendar with events on it from Event Planner, MyEventRunner, Speakers and Calendar Items.
Home Page Stories - A webpage that displays stories.
Photo Albums - A webpage that displays photo albums.
Search - A webpage where you can perform a search for content on the website.
Sign Up - A webpage where a person can enter in their information to be added to the club's email list.
Speakers - A webpage that displays speakers.
eDirectory Report 2.0 (Login Required) - Takes the member to the eDirectory Report 2.0 page in ClubRunner.
Edit My Profile (Login Required) - Takes the member to their profile in ClubRunner.
Email Message Centre (Login Required) - Takes the member to the Email Message Centre.
View Club Directory (Login Required) - Takes the member to the Club Directory
View Club Documents (Login Required) - Takes the member to the Club Documents page.
View Club Photo Directory (Login Required) - Takes the member to the Club Photo Directory.
Custom Page: This allows you to link to a custom page you have created within the website
Document: Allows you to select a file for download from the club's documents area.
Download File: Allows you to select a file for download from the Download Files area.
Email: Allows you to enter in an email address, which could have a default subject and message.
Event: Displays a dropdown list of events from Event Planner and MyEventRunner.
Photo Album: This activates a dropdown menu, in which you may select a link to a photo album to display on the homepage menu.
Signup Lists: Displays a dropdown list for a volunteer signup list.
Site Page: This allows you to link to a site page you have created within the website.
Speaker: Displays a dropdown list of Speakers which you can select.
Story: This activates a drop down menu, in which you may select a link to an existing story to display.
After you select the link type, please select what is to be linked or paste in the URL, if you selected URL.
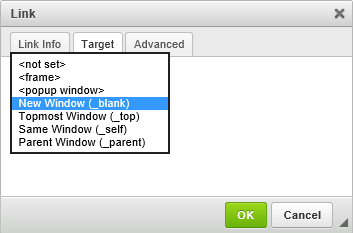
Click the Target drop-down selection and you have the option to select whether the link will open in the Same Window, in a New Window, etc.

Once you are done, click on OK and your hyperlink will be ready.
Removing a Link
Removing a link is just as easy as adding it.
Click the linked text or image in the textbox, and the Unlink icon in the online editor tools will be come active.
Click the Unlink icon to remove the link from the highlighted text or image.

